Select the device which you are going to complete the process on
Install just hours before your trip and activate during your flight or when you arrive at your destination.
Select Install with QR Code if you have the code on another device to scan.
Select Install Manually if you are unable to scan the QR code.
Install just hours before your trip and activate during your flight or when you arrive at your destination.
Select Install with QR Code if you have the code on another device to scan.
Select Install Manually if you are unable to scan the QR code.
Select the type of installation you wish to perform
Before you begin installation with a QR code, there are a few important points to be aware of:
You must have the QR code on another screen or device to scan it with your phone camera.
Make sure you have a stable internet connection throughout the process.
Please note that the QR code can only be scanned once.
Do not remove the eSIM from your device as you will not be able to use it again.
Let’s get started together
Open your email
Open your email on a different device to the one you will be using for installation and find the email we sent you with the QR code.
If you have not received your code, please contact us.
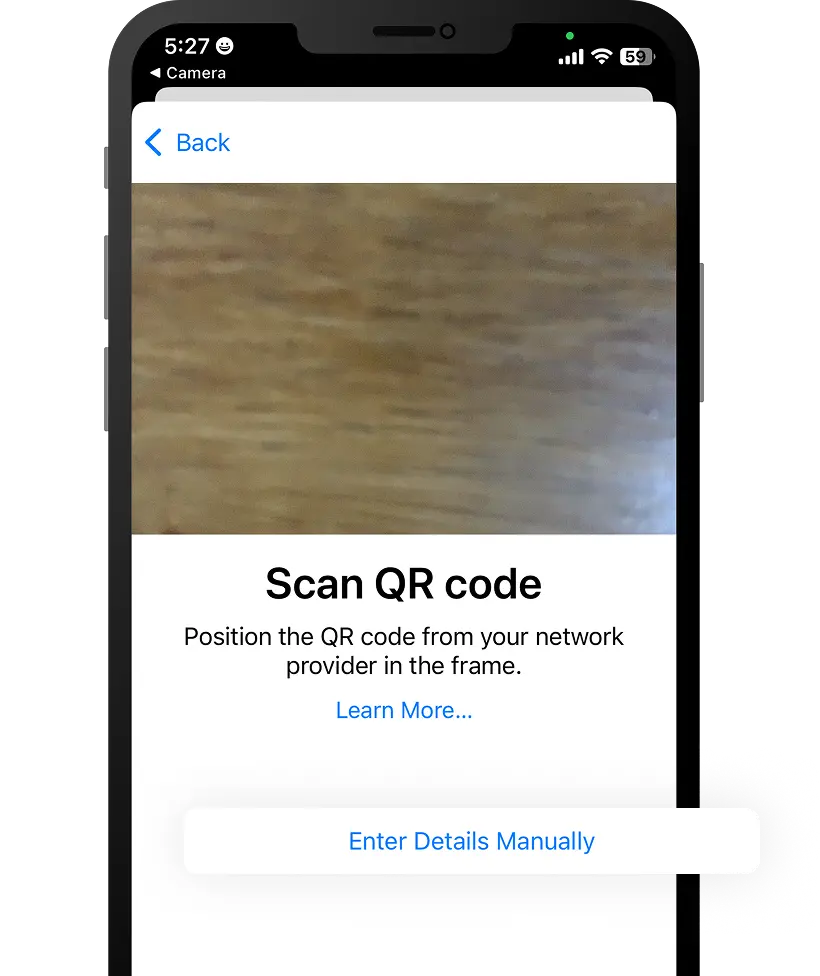
Scan the QR code
Open your camera on the iPhone you will be installing the eSIM on and scan the code. You can also go to Settings , then Mobile Data and select Add Data Plan to scan the code from there.
Follow the installation steps on your iPhone
Scanning the code will start the installation process. Use our guide below for step-by-step configuration.
Open your email
Open your email on a different device to the one you will be using for installation and find the email we sent you with the QR code.
If you have not received your code, please contact us.
Scan the QR code
Open your camera on the iPhone you will be installing the eSIM on and scan the code. You can also go to Settings , then Mobile Data and select Add Data Plan to scan the code from there.
Follow the installation steps on your iPhone
Scanning the code will start the installation process. Use our guide below for step-by-step configuration.
Activation guide for your eSIM
01. Install your data plan
The installation process will start automatically when you scan the QR code on your iPhone.
Click on Continue
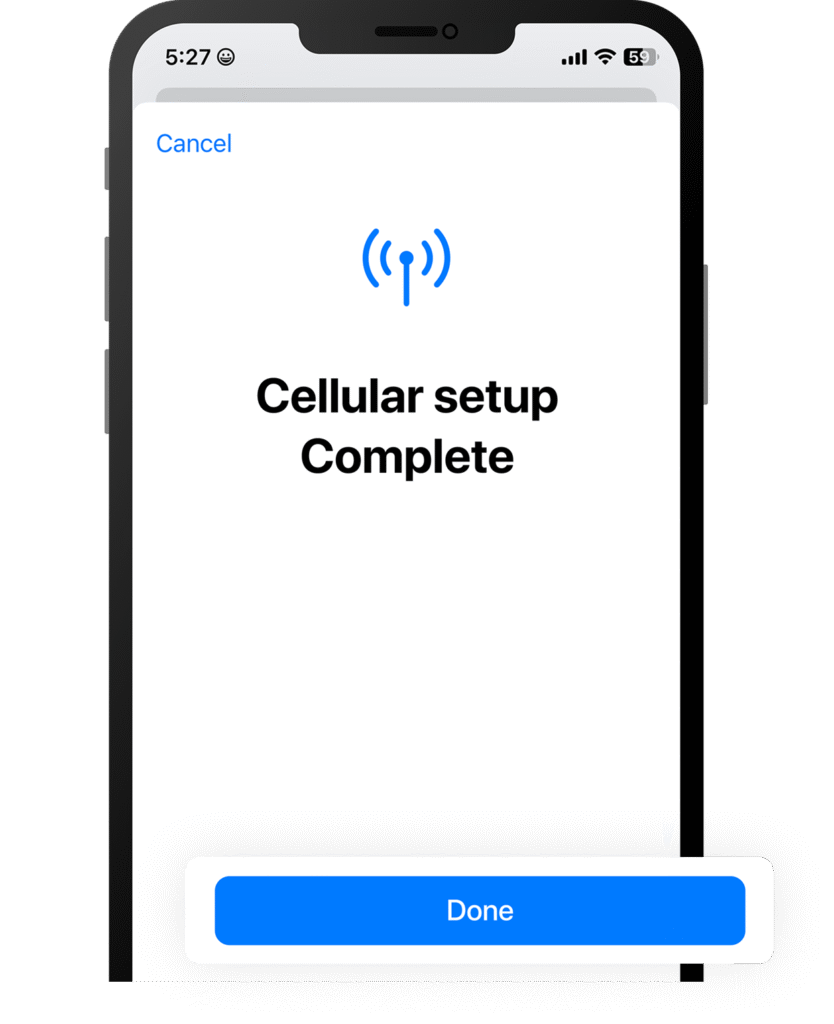
02. Mobile configuration completed
Your plan has now been installed.
Click on Done
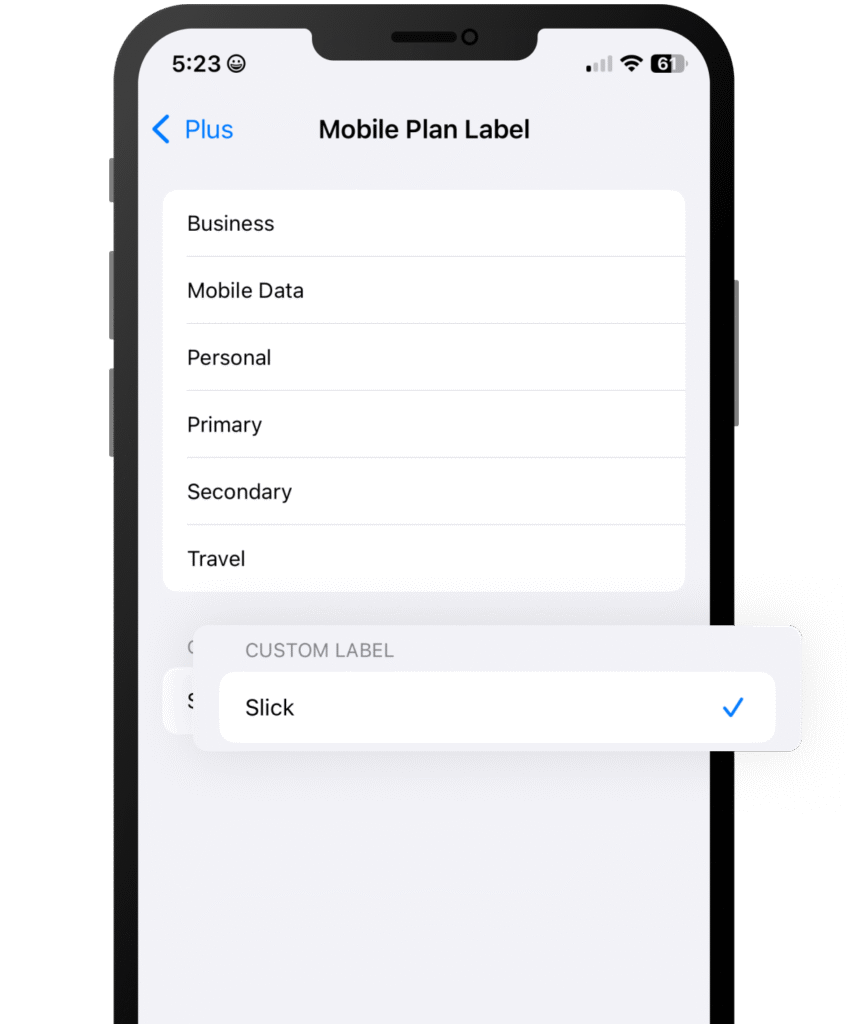
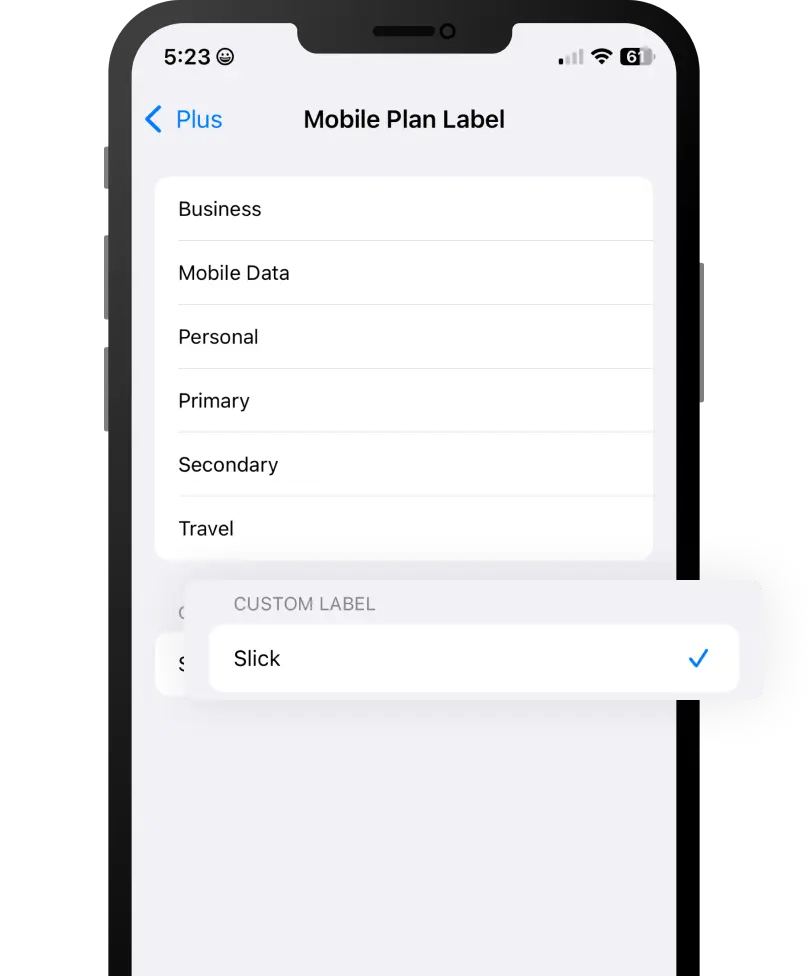
03. Label your data plan
Give your new Slick line a name to identify it. For example: Slick.
Click on Continue
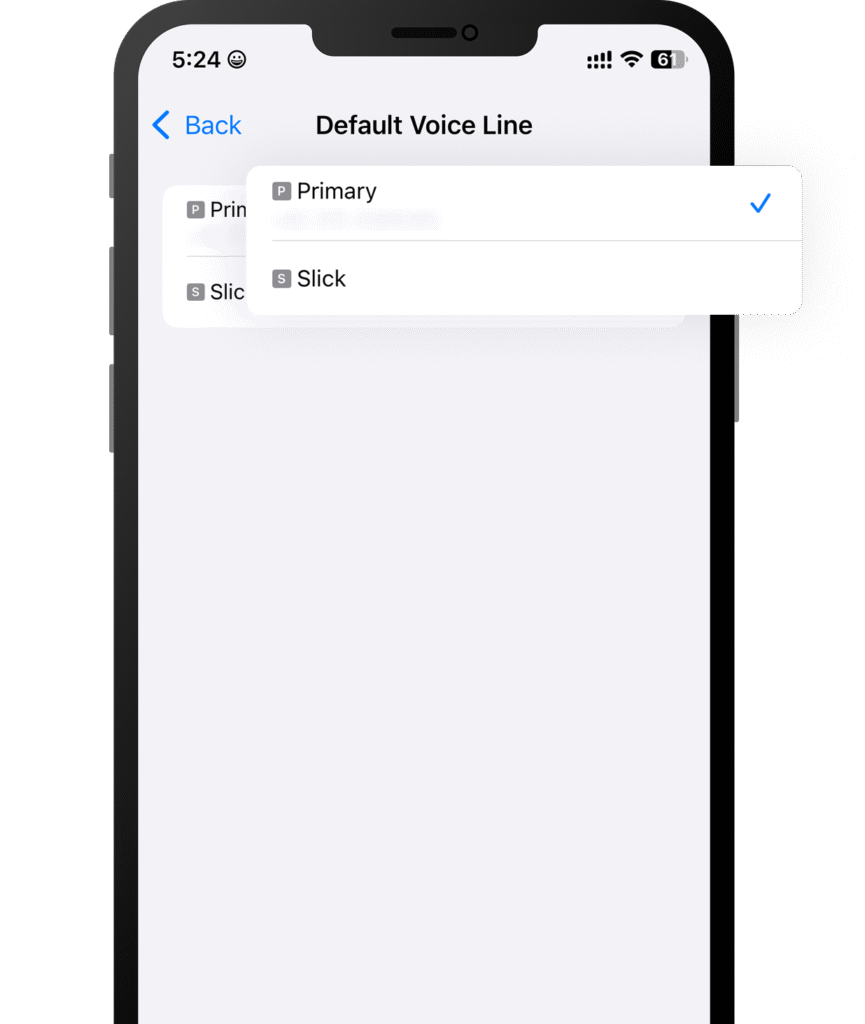
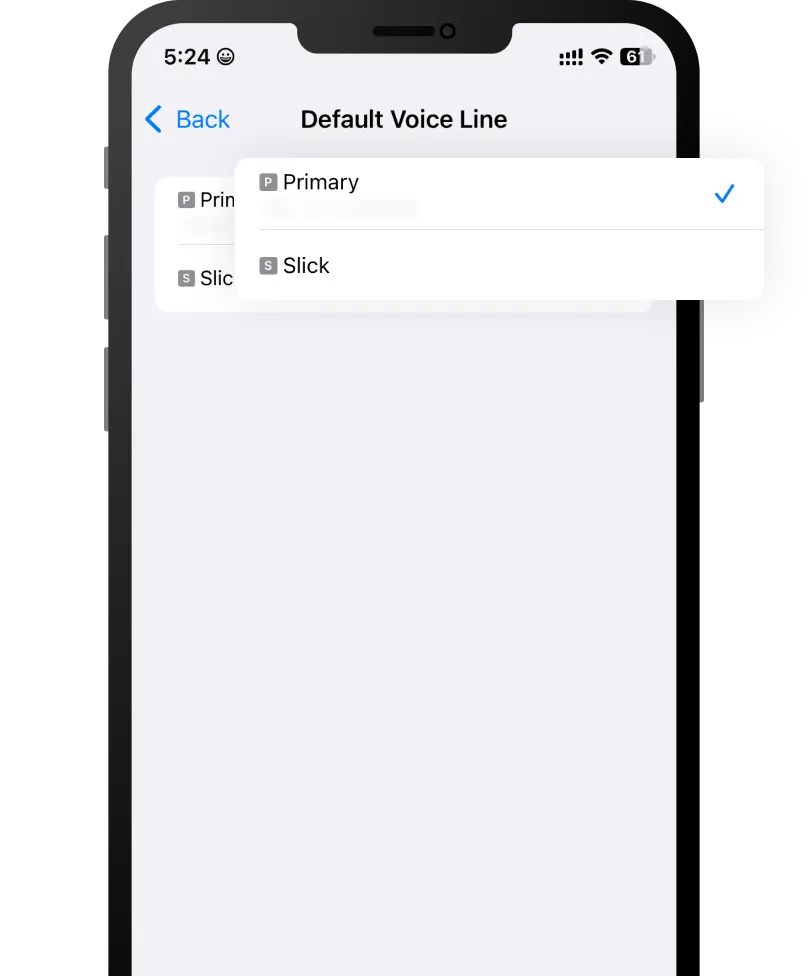
04. Choose your default line
Select the Primary option to continue using your number to receive messages and calls.
Click on Continue
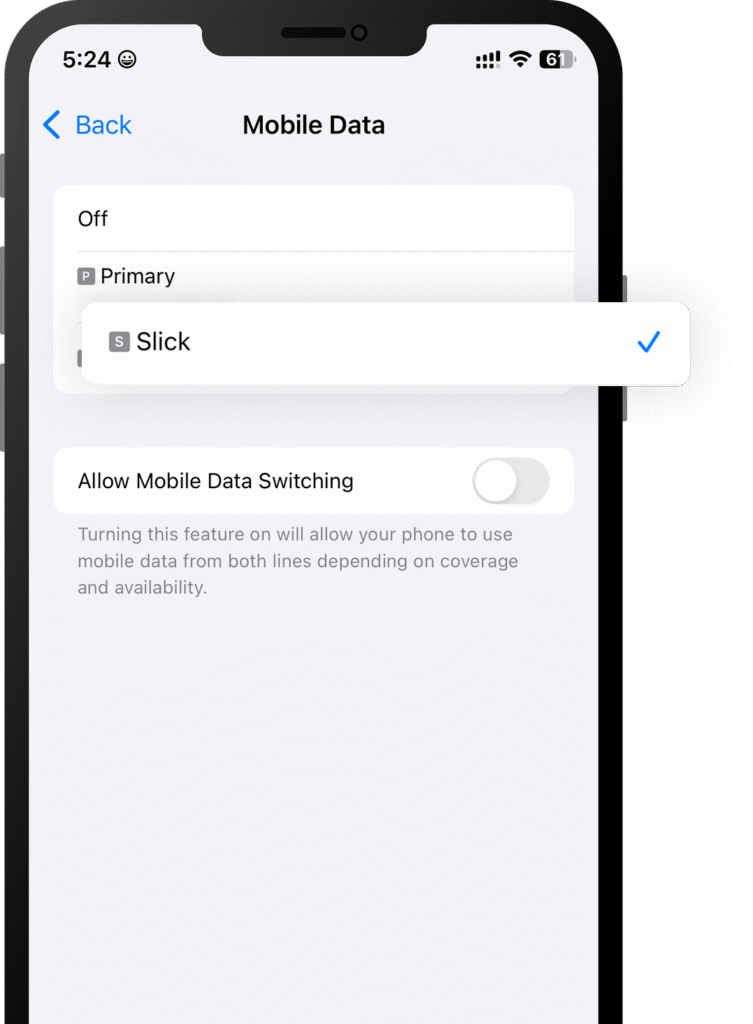
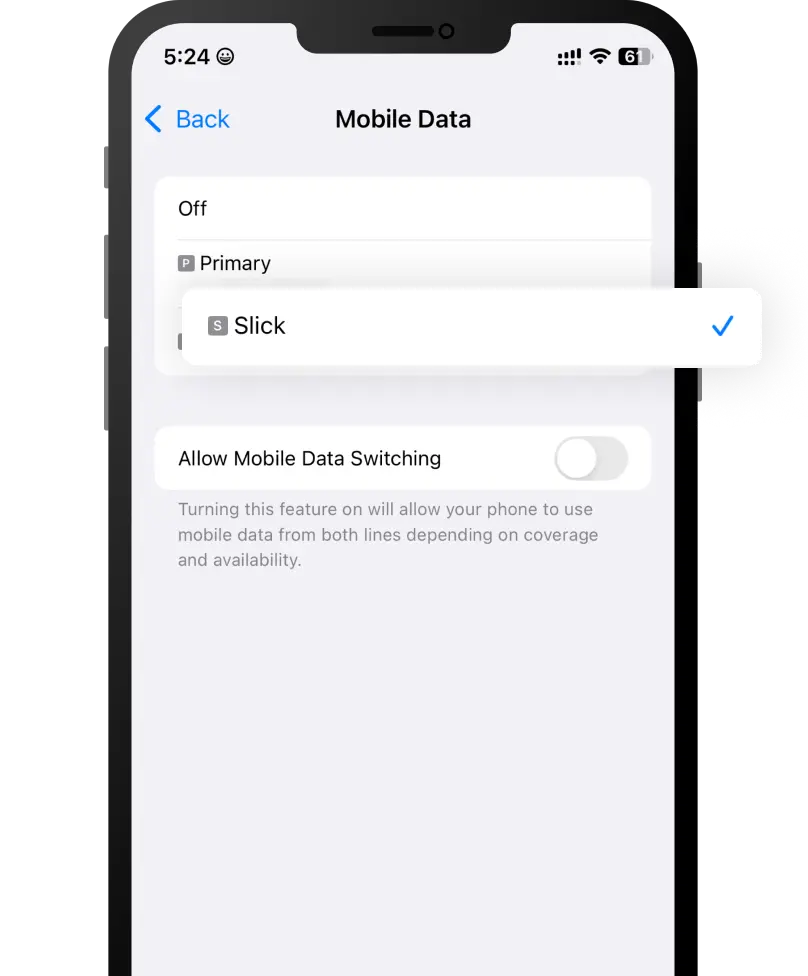
05. Mobile data
Select the Slick option.
Keep Allow Mobile Data Switching turned off to avoid additional roaming charges.
Click on Continue
Before you begin manual installation, there are a few important points to be aware of:
Manual installation codes can only be used once.
Make sure you have a stable internet connection throughout the process.
Do not remove the eSIM from your device as you will not be able to use it again.
Let’s get started together
Open your email
Check the email we sent you with both the SM-DP + address code and the Activation Code and have them to hand to start the installation. We also text them to you as an SMS.
If you have not received the codes, please contact us.
Open “Settings” on your iPhone
Next, go to Mobile Data , click on Add eSIM or Add Data Plan and select Use QR Code.
Follow the installation steps on your iPhone
Once you get to Scan QR Code , select Enter Details Manually and follow the steps displayed on your iPhone.
Activation guide for your eSIM
01. Go to Settings
Once there, click on “Mobile Data”, then “Add eSIM” or “Add Data Plan” and select “Use QR Code”.
Finally, click on “Enter Details Manually”
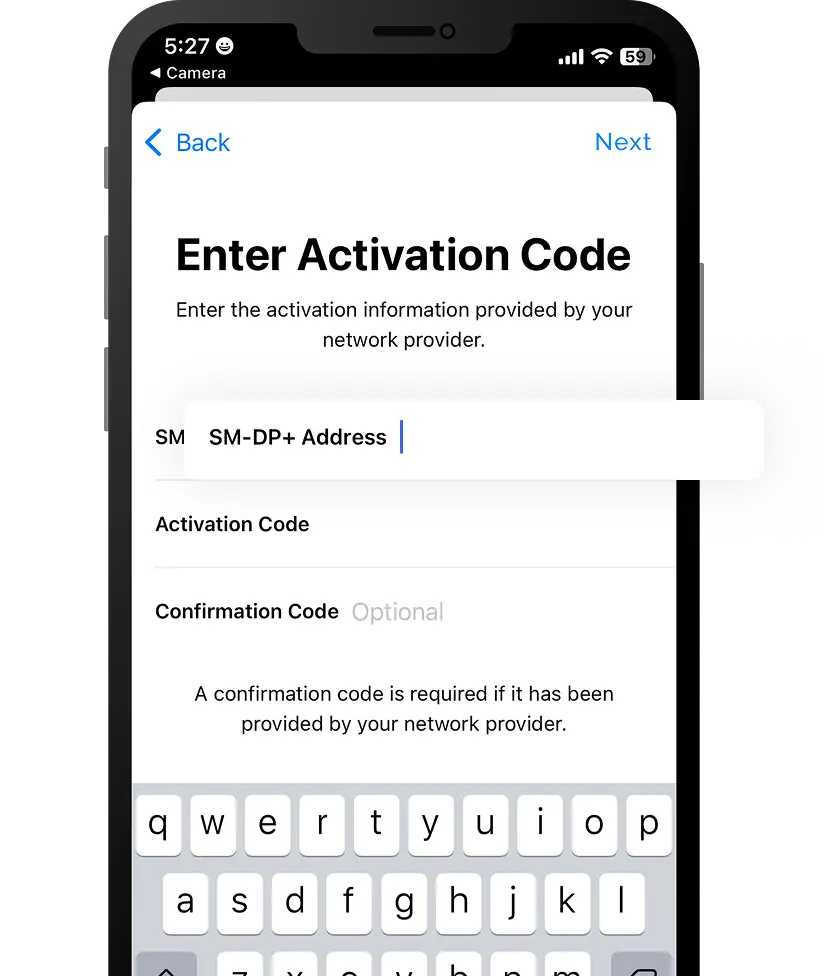
02. Add your data plan
Now it’s time to copy and paste the SM-DP + address and Activation Code into the corresponding field.
Click on Next
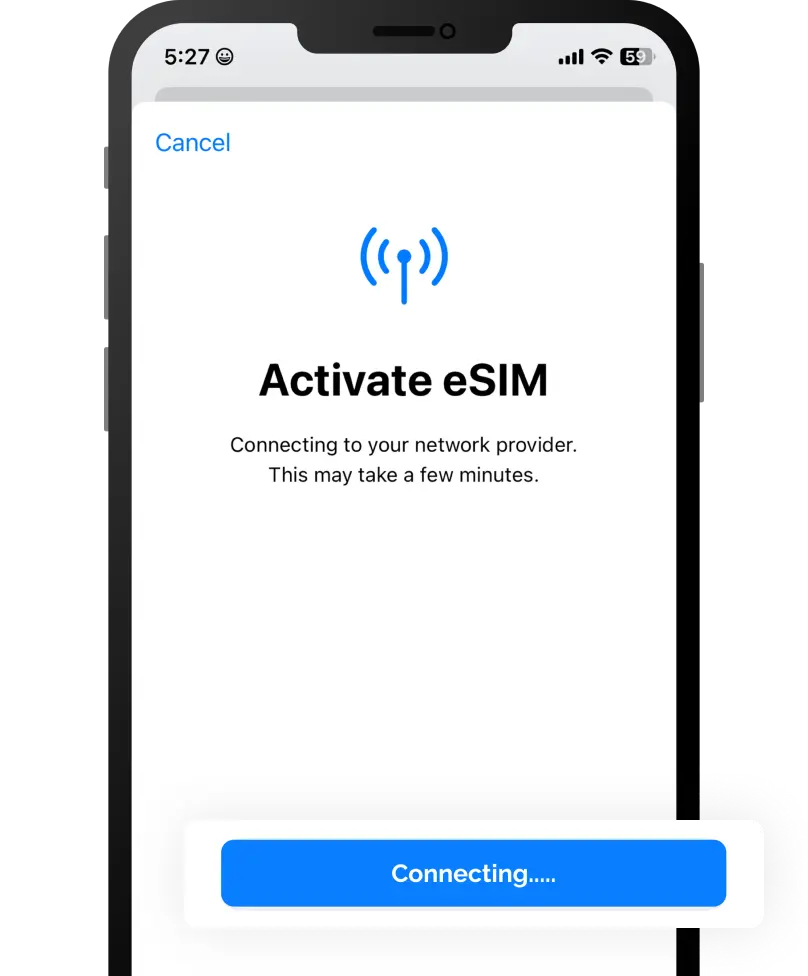
03. Install your data plan
Your iPhone will show you your new data plan.
Press “Continue” and wait for your plan to be installed (this can take a few minutes).
04. Label your data plan
Give your new Slick line a name to identify it. For example: “Slick Spain”.
Click on Continue
05. Choose your default line
Select the “Primary” option to continue using your number to receive messages and calls.
Click on Continue
06. Mobile data
Select the “Secondary” option.
Keep “Allow Mobile Data Switching” turned off to avoid additional roaming charges.
Click on Continue
Congratulations!
Your plan has now been installed and is ready to activate.
You must be at the destination for which you purchased your eSIM to activate it.
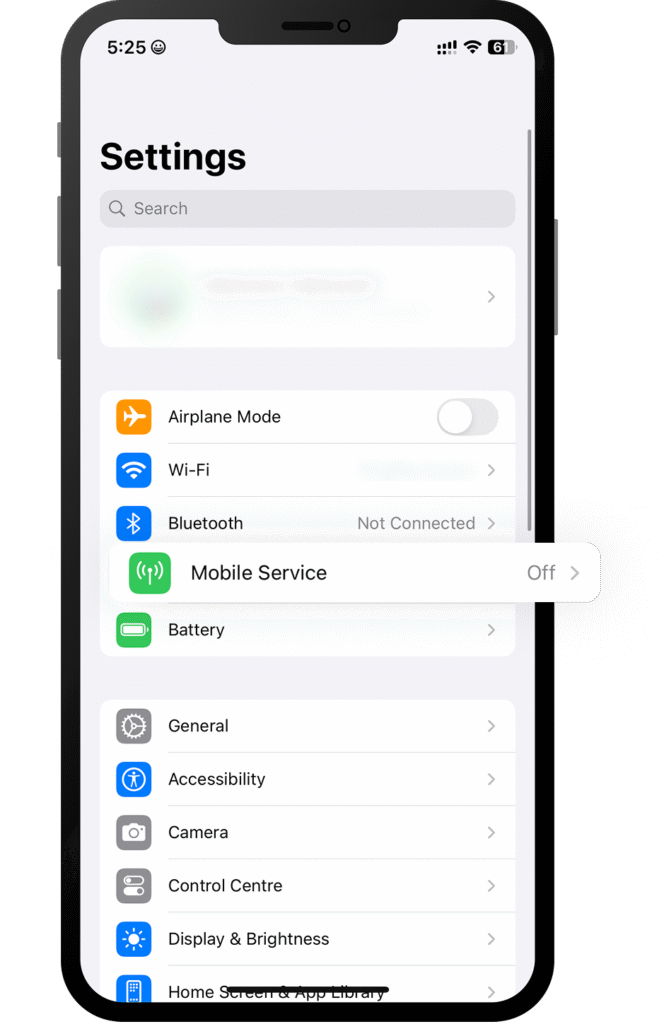
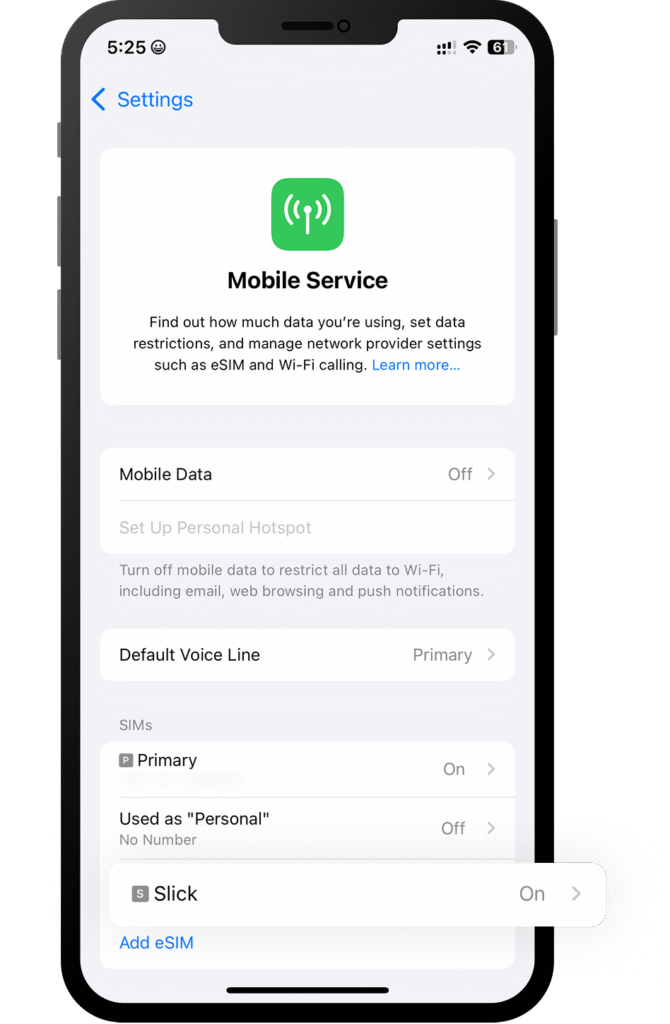
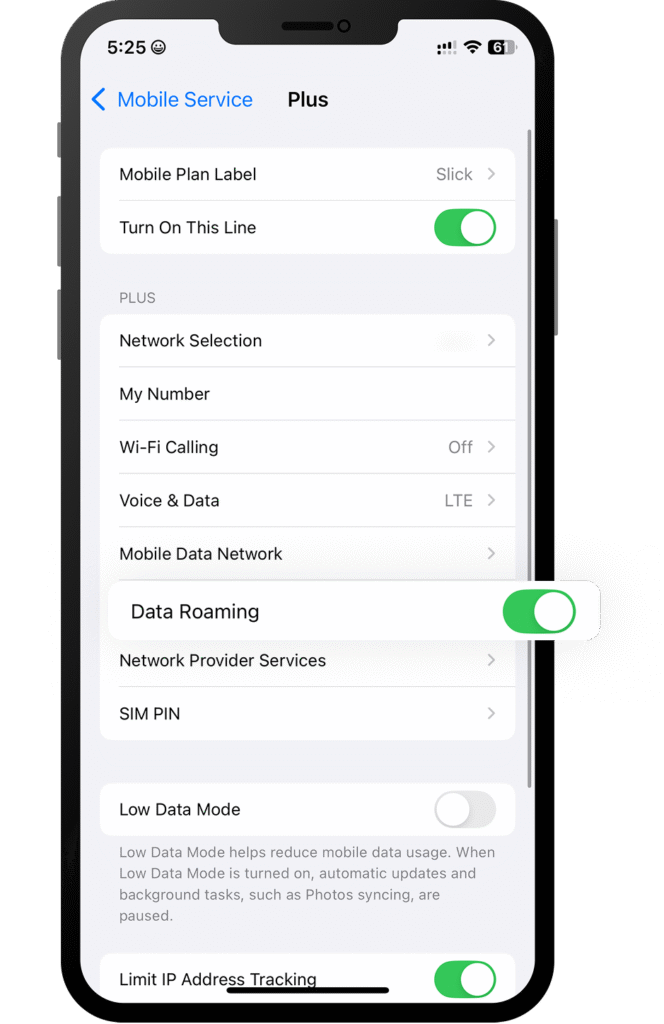
Open “Settings” on your iPhone and select “Mobile Data”
Select the “Slick” option in the list
Scroll down until you find “Data Roaming” and turn it on.
Open “Settings” on your iPhone and select “Mobile Data”
Select the “Slick” option in the list
Scroll down until you find “Data Roaming” and turn it on.
That’s it! Your plan is now active and you can start using your data.
How do you know your eSIM is active?
You can check in two ways:
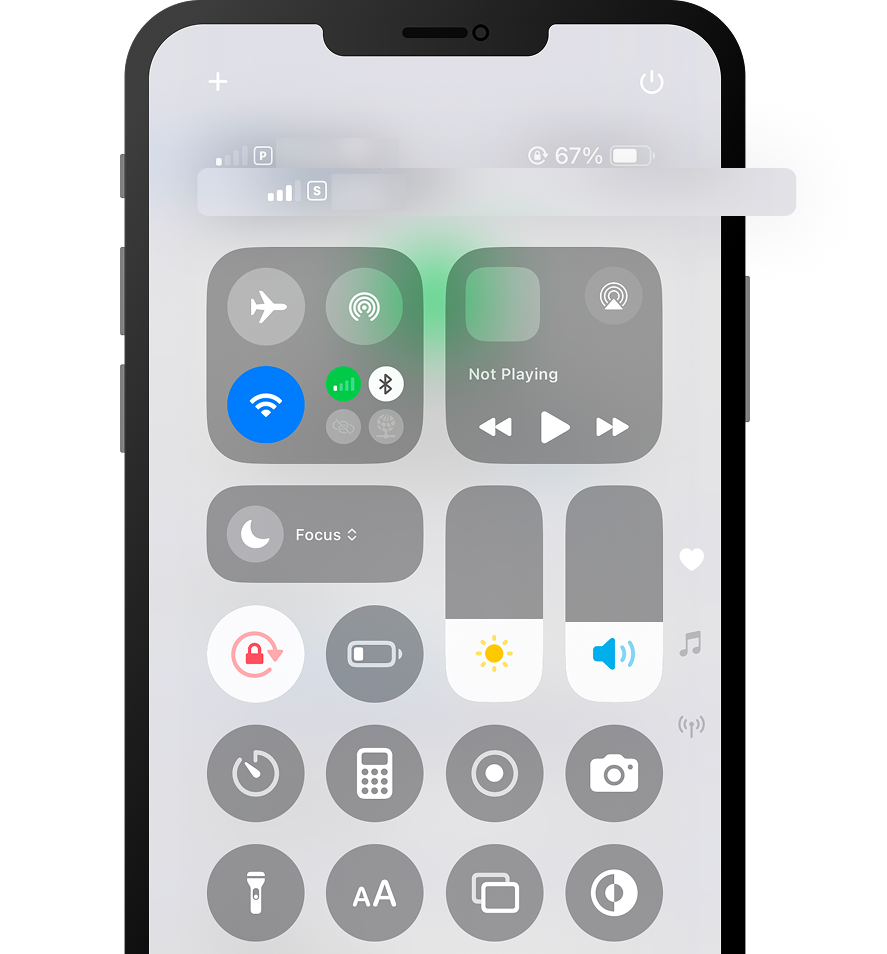
Make sure there is at least one bar in the signal icon on your iPhone.
Go to Settings on your iPhone, select Mobile Data, click on the Slick option and check that Data Roaming is turned on.
How do you know your eSIM is active?
You can check in two ways:
Make sure there is at least one bar in the signal icon on your iPhone.
Go to Settings on your iPhone, select Mobile Data, click on the Slick option and check that Data Roaming is turned on.
Install just hours before your trip and activate during your flight or when you arrive at your destination.
Select the device on which you will perform the installation.
Select Install with QR Code if you have the code on another device to scan.
Select Install Manually if you are unable to scan the QR code.
Select the type of installation you wish to perform
Before you begin installation with a QR code, there are a few important points to be aware of:
You must have the QR code on another screen or device to scan it with your phone camera.
Make sure you have a stable internet connection throughout the process.
Please note that the QR code can only be scanned once.
Do not remove the eSIM from your device as you will not be able to use it again.
Let’s get started together
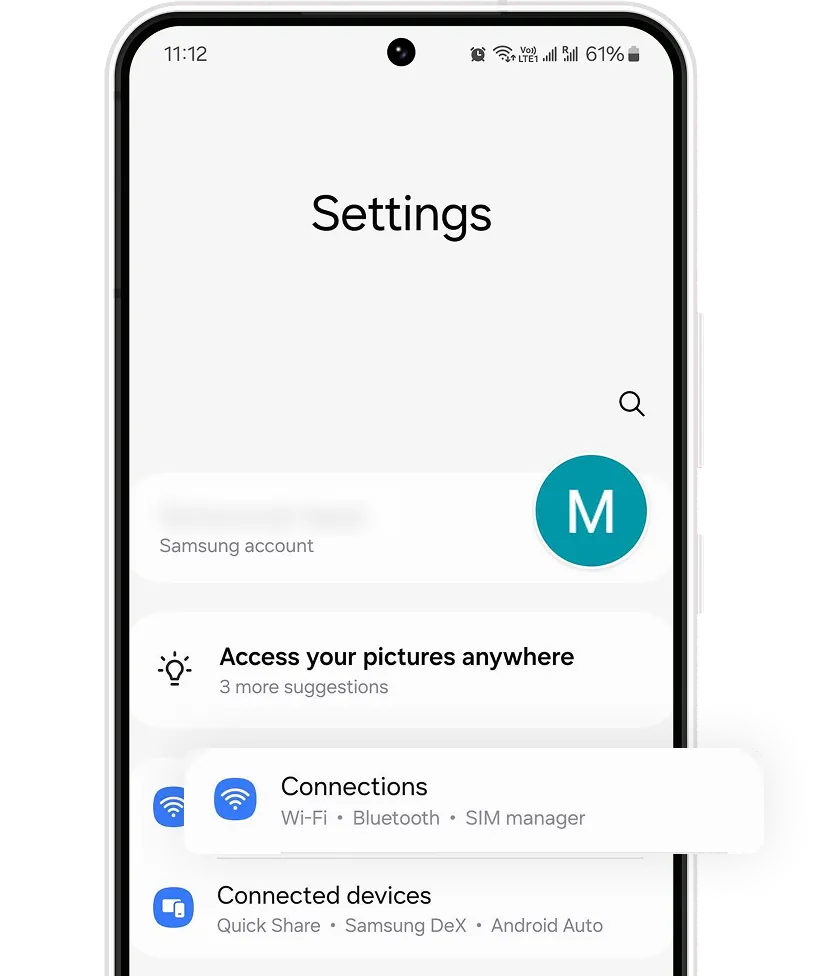
Open Settings on your device
Press Connections and enter SIM card manager. Then click on Add eSIM to start the installation process.
Open your email
Open your email on a different device to the one you will be using for installation and find the email we sent you with the QR code.
If you have not received your code, please contact us.
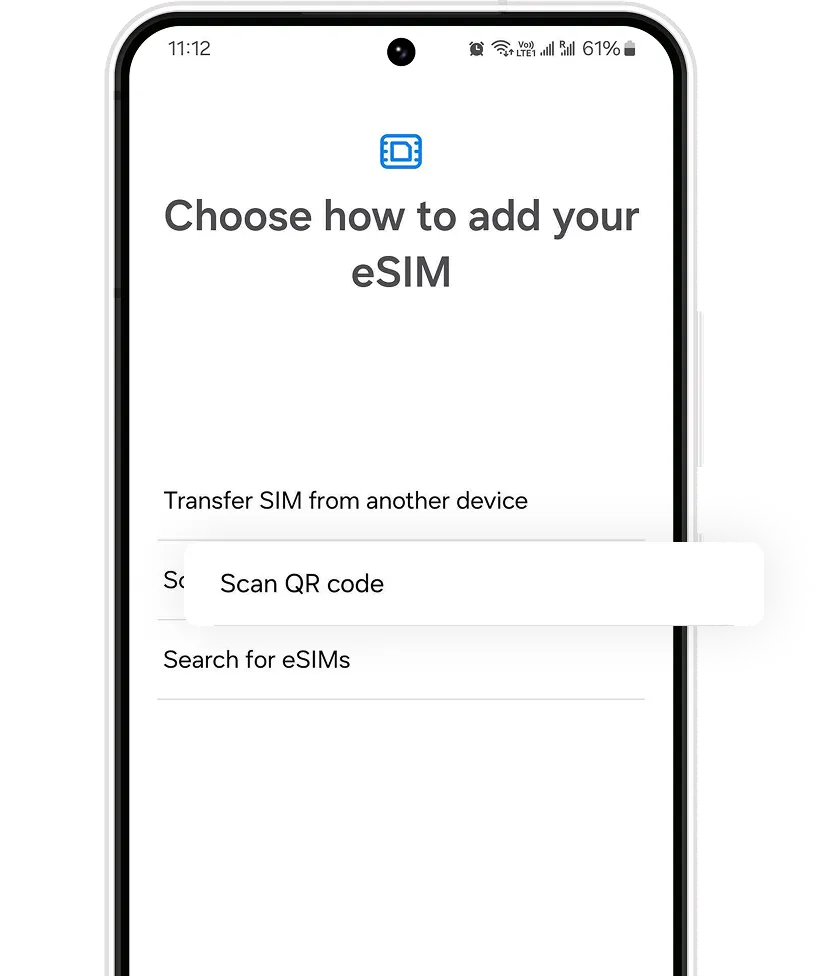
Scan the QR code and follow the installation steps
Scan the code sent to your email and follow the on-screen steps to install your eSIM. When you arrive at your destination, follow the activation instructions to connect to the internet.
Open Settings on your device
Press Connections and enter SIM card manager. Then click on Add eSIM to start the installation process.
Open your email
Open your email on a different device to the one you will be using for installation and find the email we sent you with the QR code.
If you have not received your code, please contact us.
Scan the QR code and follow the installation steps
Scan the code sent to your email and follow the on-screen steps to install your eSIM. When you arrive at your destination, follow the activation instructions to connect to the internet.
eSIM installation guide with QR code
01. Settings
Go to your phone settings and then to Connections. Verify that you have a stable internet connection (Wi-Fi or mobile data).
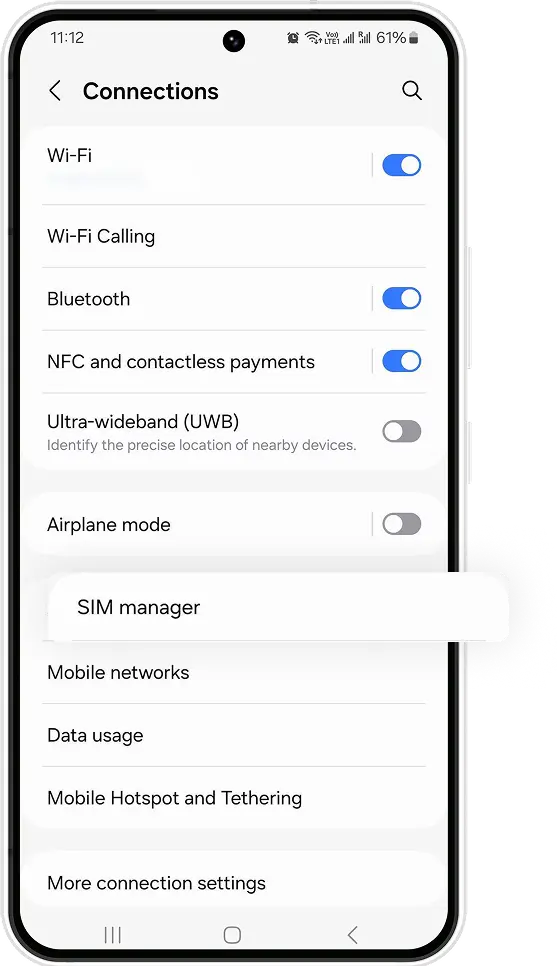
02. SIM Card Manager
When you enter Connections, look for SIM card manager to find your eSIM installation options.
03. Add your eSIM
Under eSIMs, select + Add eSIM to start the installation process of your new mobile plan.
04. Installation Options
Select Scan QR from service provider.
Have the QR code ready, either printed or on another device. This code will be sent to your email when you make your purchase.
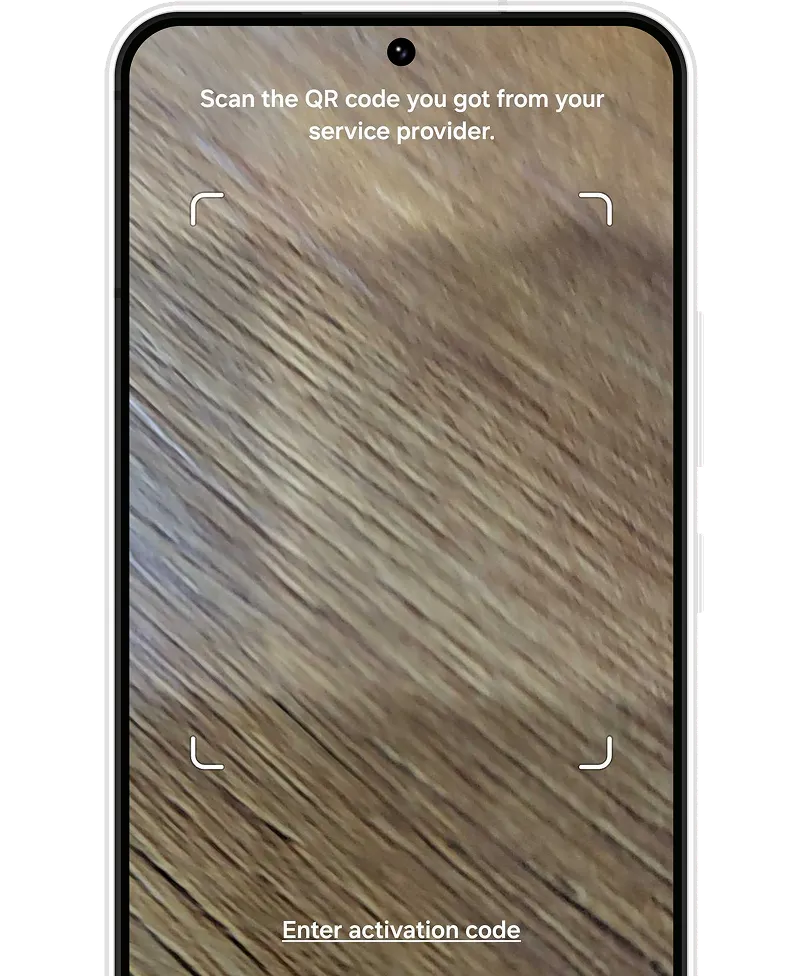
05. Scan the QR code
Scan the QR code we sent to your email by pointing the box shown on the screen over the QR code. Wait a few seconds while your new mobile plan is identified.
06. Label your new data plan
If you want to change the name of your eSIM, click on your new plan and select the option that says Name.
We recommend naming it, for example Slick.
Before you begin manual installation, there are a few important points to be aware of:
Manual installation codes can only be used once.
Make sure you have a stable internet connection throughout the process.
Do not remove the eSIM from your device as you will not be able to use it again.
Let’s get started together
Open your email
Find the email where we sent you the Android activation code when you made the purchase.
If you have not received your code, please contact us.
Open Settings on your device
Press Connections and enter the SIM card manager. Now press Add eSIM to start the installation process.
Follow the installation steps
Select Scan QR from service provider, and press Enter activation code. Follow the steps that your device displays.
eSIM installation guide with QR code
01. Settings
Go to your phone settings and then to Connections. Verify that you have a stable internet connection (Wi-Fi or mobile data).
02. SIM Card Manager
When you enter Connections, look for SIM card manager to find your eSIM installation options.
03. Add your eSIM
Under eSIMs, select + Add eSIM to start the installation process of your new mobile plan.
04. Installation Options
Select Scan QR from service provider.
Have the QR code ready, either printed or on another device. This code will be sent to your email when you make your purchase.
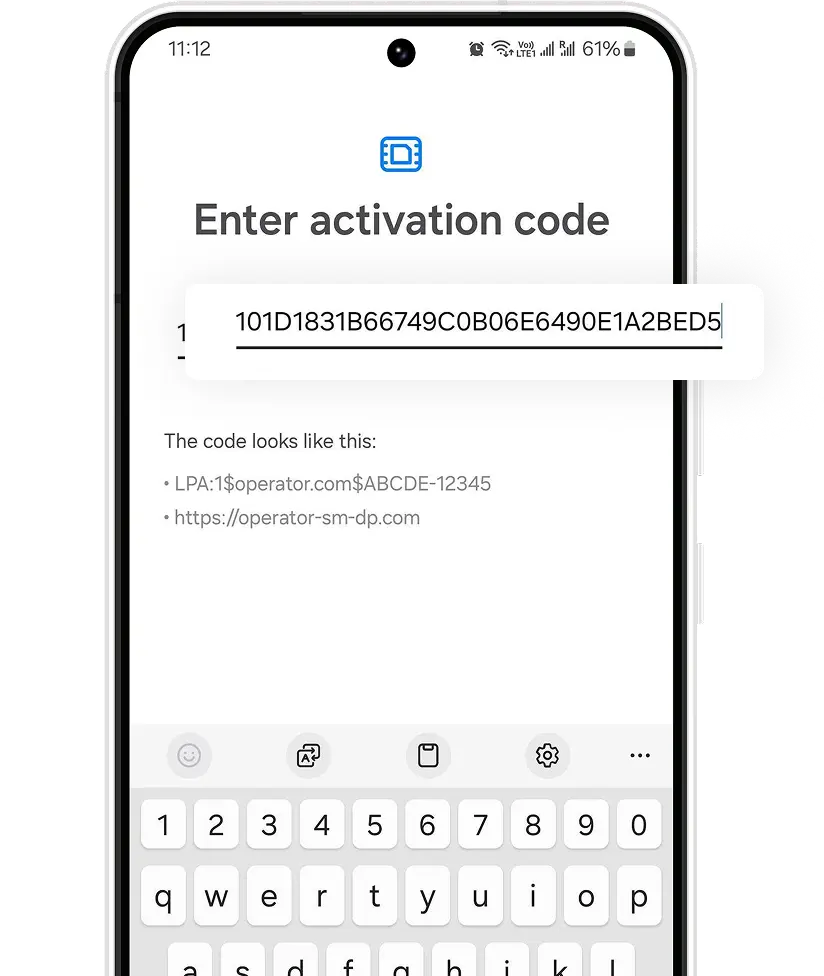
05. Add manually
Click on the Enter activation code option below the box.
06. Enter the code
Copy and paste the manual installation code for Android sent to your email.
Click Continue and wait a few seconds.
06. Label your new data plan
If you want to change the name of your eSIM, click on your new plan and select the option that says Name.
We recommend naming it, for example Slick.
Congratulations!
Your plan has now been installed and is ready to activate.
You must be at the destination for which you purchased your eSIM to activate it.
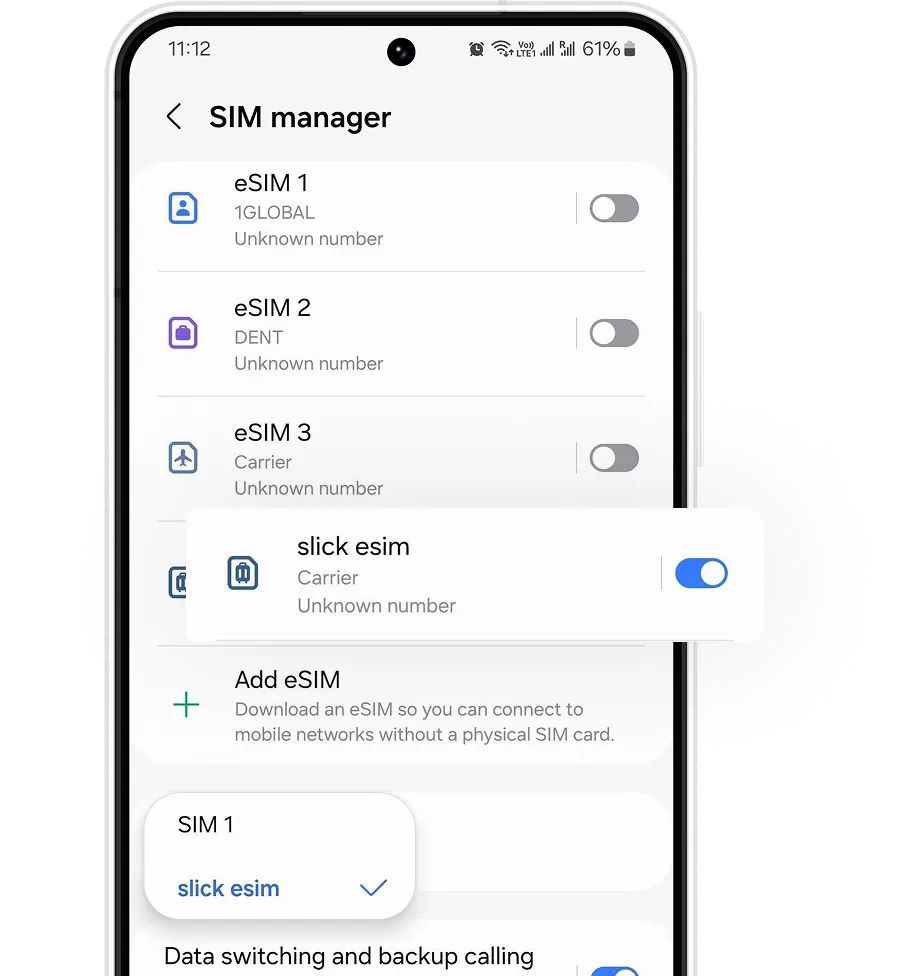
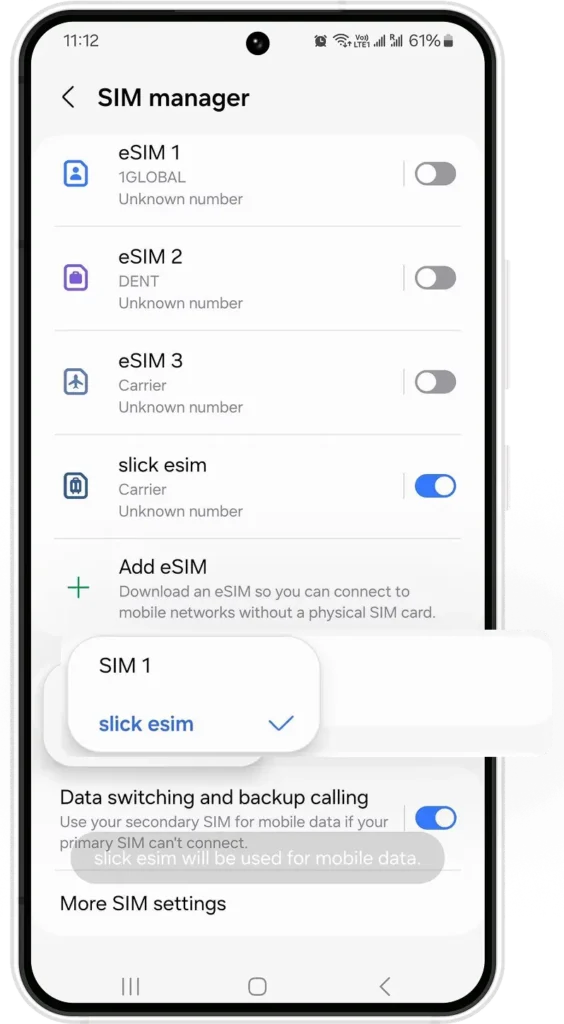
Open Settings, go to Connections and then go to the SIM card Manager.
Under Preferred SIMs, press Mobile data and select your new Slick eSIM.
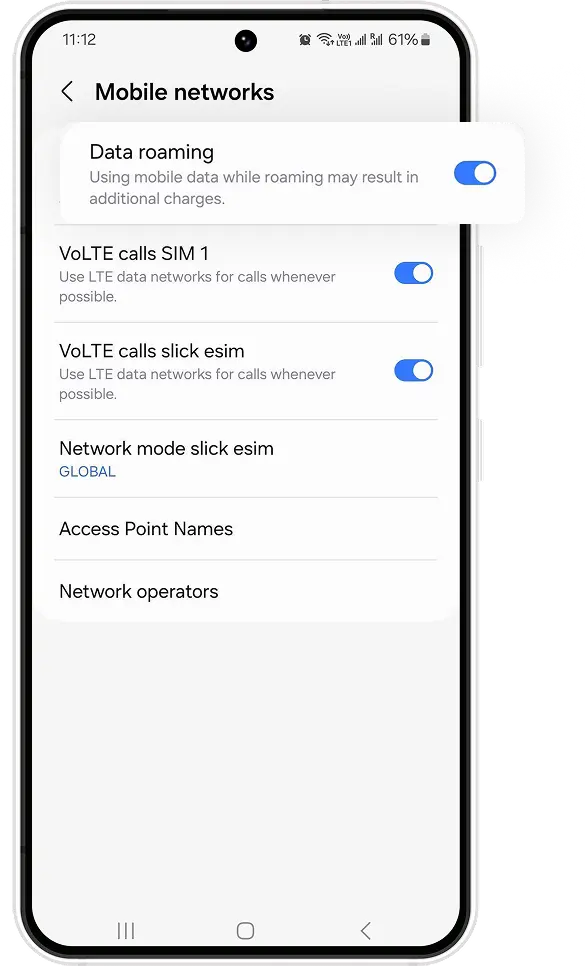
Go back toConnections and enter Mobile networks and turn on Data roaming to activate your eSIM.
Open Settings, go to Connections and then go to the SIM card Manager.
Under Preferred SIMs, press Mobile data and select your new Slick eSIM.
Go back toConnections and enter Mobile networks and turn on Data roaming to activate your eSIM.
That’s it! Your plan is now active and you can start using your data.
How do you know your eSIM is active?
You can check in two ways:
Make sure there is at least one bar in the signal icon on your iPhone.
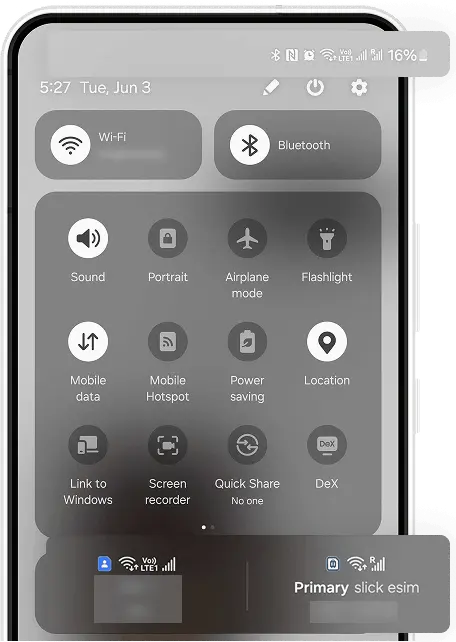
In your device’s settings, go to Connections, and click on the SIM manager option. Verify that your new plan is activated and that it is selected as the preferred SIM for mobile data.
How do you know your eSIM is active?
You can check in two ways:
Make sure there is at least one bar in the signal icon on your iPhone.
In your device’s settings, go to Connections, and click on the SIM manager option. Verify that your new plan is activated and that it is selected as the preferred SIM for mobile data.